Building a TF-Luna ROS 2 Driver: From UART Bytes to a Live /range Topic
Code on GitHubI built a Python driver and ROS 2 Jazzy node for the Benewake TF-Luna LiDAR, starting with raw nine-byte UART frames and ending with live distance measurements on a standard sensor_msgs/Range topic. This project walkthrough also shows how to build and run it.
Turning a Small LiDAR Into a ROS 2 Sensor
I recently built a Python driver and ROS 2 node for the Benewake TF-Luna, a compact time-of-flight LiDAR sensor. The goal was straightforward: read the sensor over UART, validate and decode its binary packets, and publish the resulting distance through a standard ROS 2 interface.
The finished data path looks like this:
TF-Luna LiDAR
    ↓ UART byte stream
Python driver
    ↓ validated Measurement
ROS 2 node
    ↓ sensor_msgs/Range
/range topic
What made the project valuable was building each layer independently. I could test the packet decoder without hardware, test the ROS publisher with simulated measurements, and test the serial driver before combining everything. That separation made the final hardware integration much easier to debug.
Github: github.com/danielengineer92/tf-luna-ros2
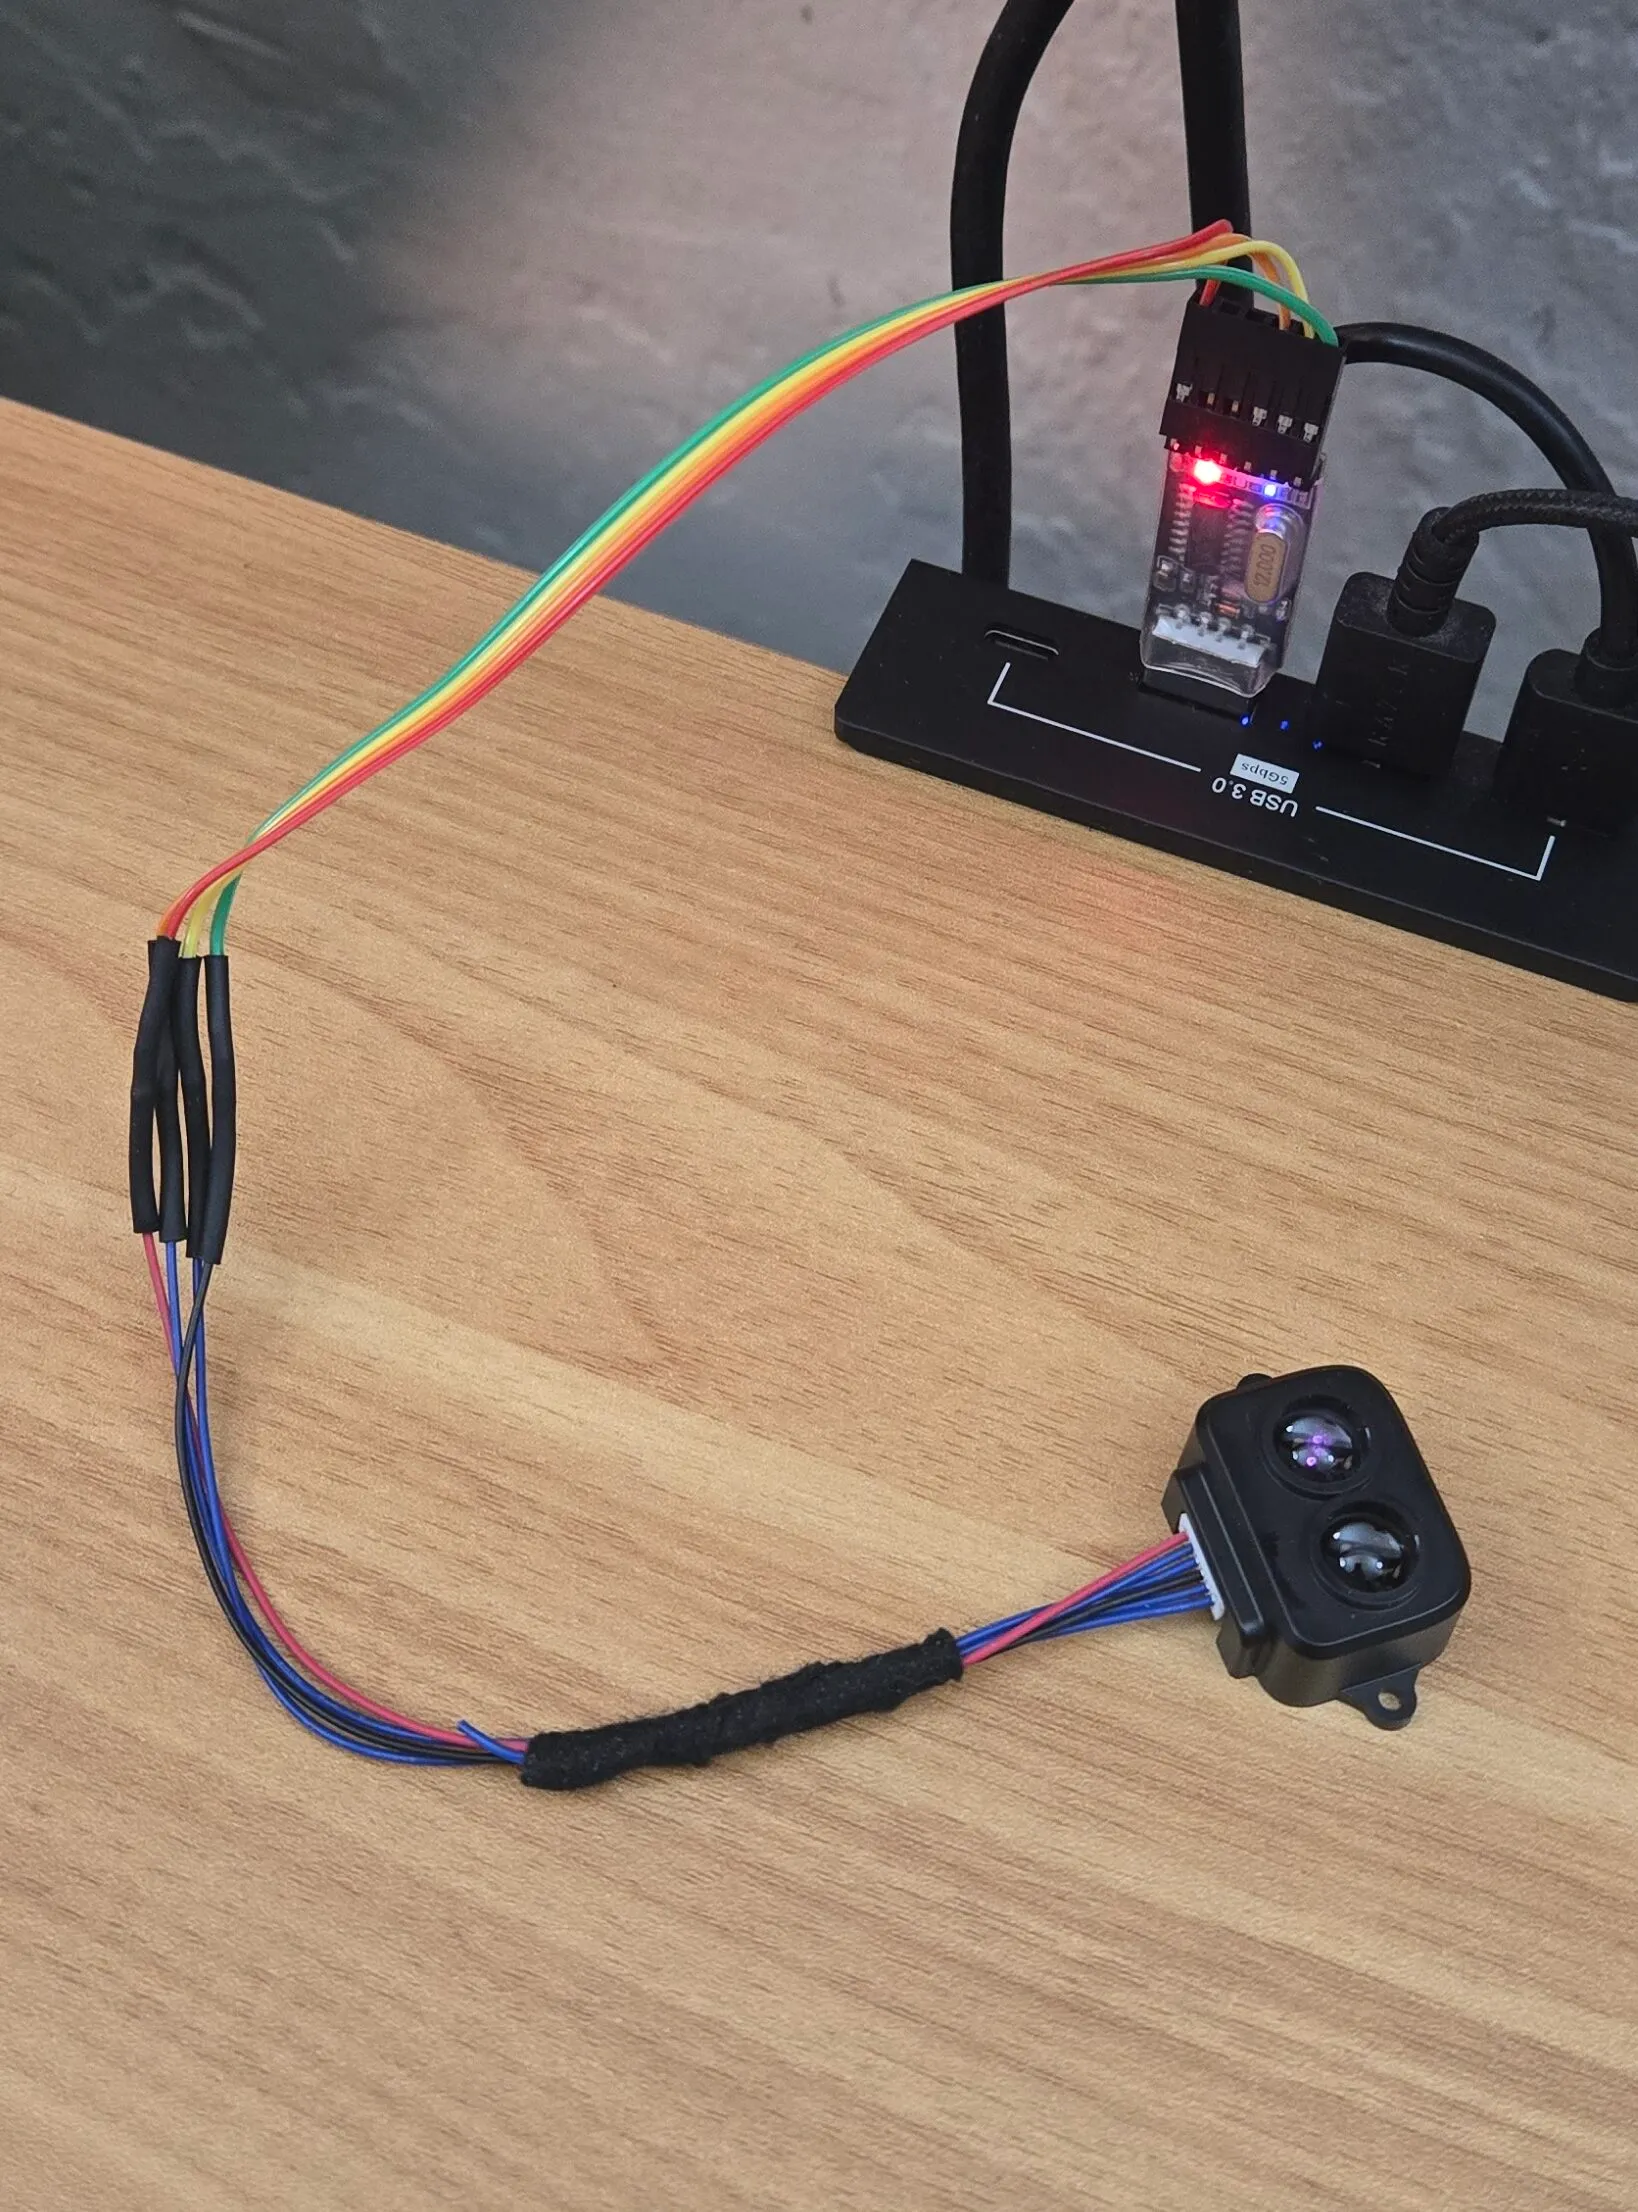
The Benewake TF-Luna connected over UART and publishing live distance measurements through ROS 2.
Starting With the Wire Protocol
The TF-Luna continuously transmits nine-byte measurement frames. Before thinking about ROS, I needed to reliably find and decode those frames.
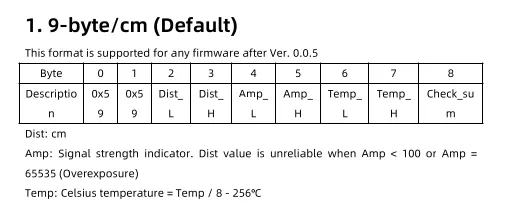
The serial stream can be opened at any point, including halfway through a packet. My driver therefore scans until it finds the two consecutive header bytes, reads the remaining seven bytes, and validates the complete frame.
The checksum is the low eight bits of the sum of the first eight bytes:
checksum = sum(data[:8]) & 0xFF

if data[8] != checksum:
    raise RuntimeError("Checksum not correct")
The measurement fields use little-endian byte order, so each two-byte value has to be reconstructed explicitly:
distance_cm = (data[3] << 8) | data[2]
strength = (data[5] << 8) | data[4]
temp_raw = (data[7] << 8) | data[6]
temp_c = (temp_raw / 8) - 256
I represent a decoded reading with an immutable dataclass:
@dataclass(frozen=True)
class Measurement:
    distance_cm: int
    strength: int
    temp_c: float
This gives the rest of the program a clean, typed object instead of passing raw byte arrays around.
Testing Before Connecting Hardware
Packet decoding is deterministic, which makes it a good target for hardware-free unit tests. I created known byte frames and verified that the driver:
- Decodes valid distance, strength, and temperature values
- Rejects frames with the wrong length
- Rejects invalid headers
- Rejects incorrect checksums
VALID_FRAME = bytes.fromhex("59 59 64 00 C8 00 20 08 06")

measurement = TFLUNA.decode_frame(VALID_FRAME)

self.assertEqual(
    measurement,
    Measurement(distance_cm=100, strength=200, temp_c=4.0),
)
This meant I could prove the protocol logic worked before introducing USB permissions, wiring, serial timing, or ROS configuration.
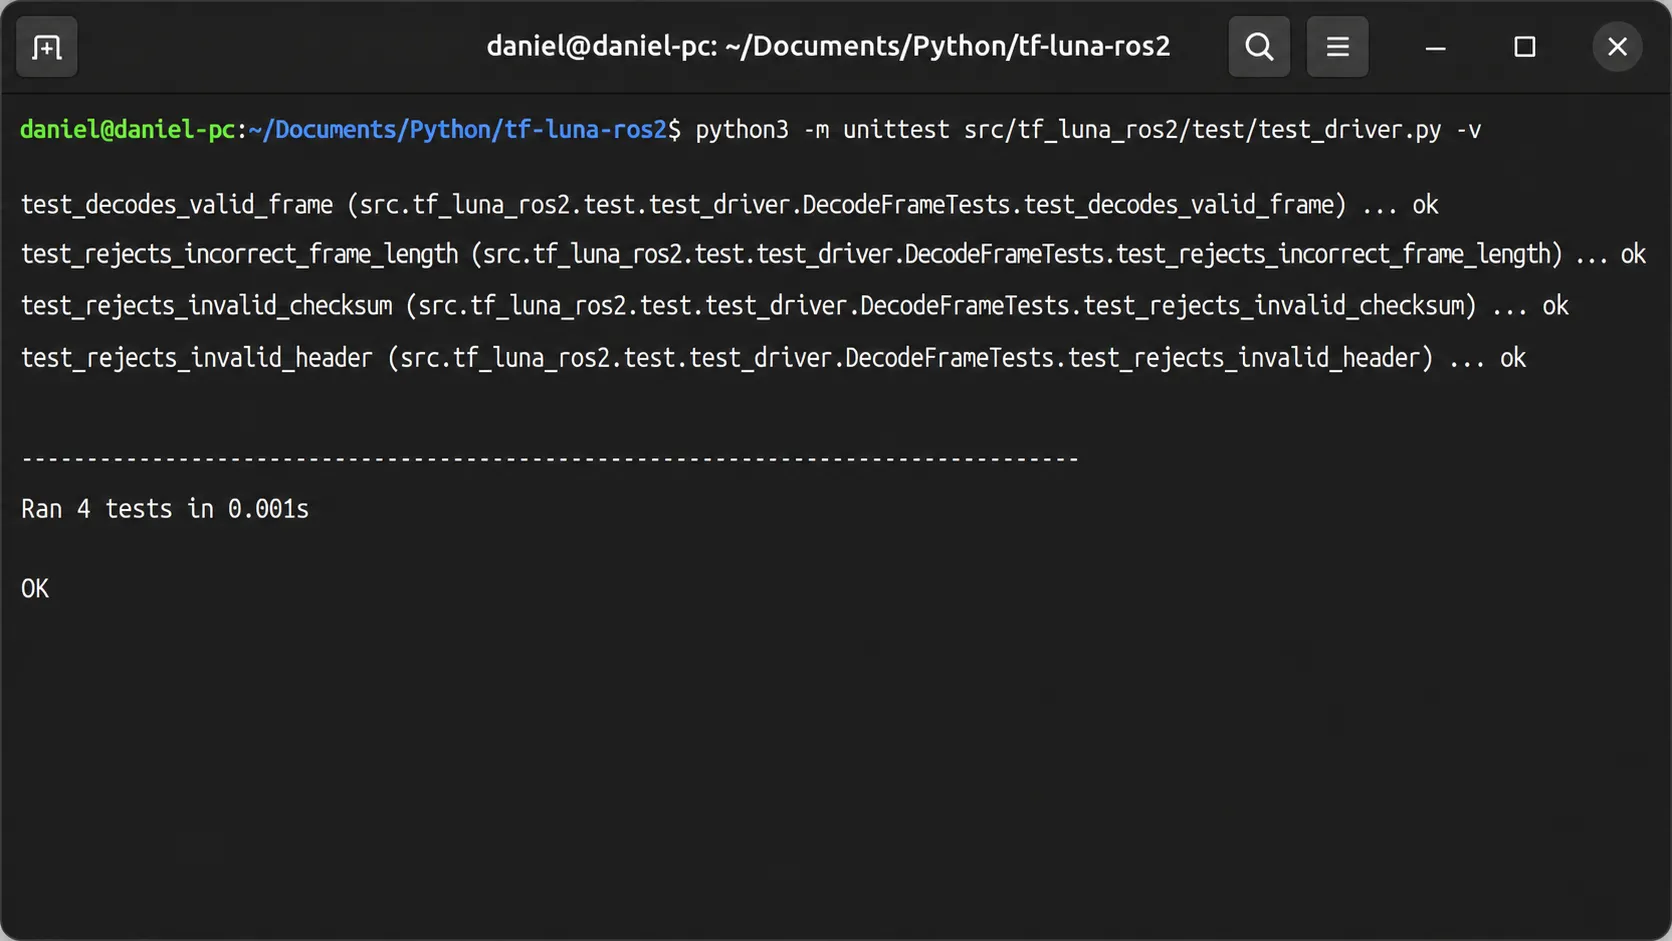
Packet decoding tests run without a connected sensor.
Converting the Project Into a ROS 2 Package
The driver began as a standalone Python program. I converted the repository into a conventional ROS 2 Jazzy workspace and generated an ament_python package:
tf-luna-ros2/
├── src/
│   └── tf_luna_ros2/
│       ├── package.xml
│       ├── setup.py
│       ├── setup.cfg
│       ├── launch/
│       ├── test/
│       └── tf_luna_ros2/
│           ├── __init__.py
│           ├── driver.py
│           └── node.py
├── build/
├── install/
└── log/
The inner tf_luna_ros2 directory is the importable Python package. The outer one is the ROS package containing its manifest, installation rules, tests, and launch files.
The package declares dependencies on:
rclpyfor the Python ROS 2 APIsensor_msgsfor standard sensor message definitionspython3-serialfor UART communicationlaunchandlaunch_rosfor starting the configured node
Publishing a Standard Range Message
The TF-Luna is a single-point infrared range sensor, so ROS 2 already provides the right message type: sensor_msgs/msg/Range.
The node owns a publisher for the /range topic:
self.range_publisher = self.create_publisher(
    Range,
    "range",
    10,
)
For every reading, the node creates a message containing a timestamp, coordinate-frame name, sensor type, field of view, rated limits, and measured range:
message = Range()
message.header.stamp = self.get_clock().now().to_msg()
message.header.frame_id = "tf_luna_link"
message.radiation_type = Range.INFRARED
message.field_of_view = math.radians(2.0)
message.min_range = 0.2
message.max_range = 8.0
message.range = float(distance_m)
ROS uses SI units, so the node converts the driver’s centimeters into meters:
distance_m = measurement.distance_cm / 100.0Using a standard message makes this node immediately compatible with other ROS tools and nodes. A consumer does not need to understand the TF-Luna UART protocol; it only needs to subscribe to sensor_msgs/Range.
Simulating the Sensor First
Before opening the serial port, I added a simulation mode that published a configurable one-meter reading. This let me inspect the node in the ROS graph and verify topic communication independently of the hardware.
ros2 param set /tf_luna_node simulated_range 2.5
ros2 topic echo /range
Changing the parameter while the node was running immediately changed the published range. This also reinforced an important ROS concept: parameters are declared once during node initialization and read later inside callbacks.
One useful debugging lesson came from assigning the entire ROS Parameter object to the message instead of its floating-point value. The generated message serializer correctly rejected the wrong Python type. The fix was to retrieve .value and explicitly convert it:
message.range = float(
    self.get_parameter("simulated_range").value
)
Connecting the Real TF-Luna
Linux detected my USB-to-UART adapter as /dev/ttyUSB0 and provided a persistent device link:
/dev/serial/by-id/usb-1a86_USB_Serial-if00-port0I added my user to the dialout group so the node could access serial devices without running as root:
sudo usermod -aG dialout "$USER"Before involving ROS, I tested the driver directly:
Measurement(distance_cm=11, strength=7517, temp_c=41.0)That result proved the physical chain was working: sensor power, UART wiring, USB adapter, Linux permissions, pySerial, frame synchronization, checksum validation, and decoding.
The ROS node can now start in either mode:
simulate_sensor=true   → publish a configurable simulated distance
simulate_sensor=false  → read measurements from the physical TF-Luna
At the sensor’s default 100 Hz frame rate, the node reads measurements on a 0.01-second timer and publishes them on /range.
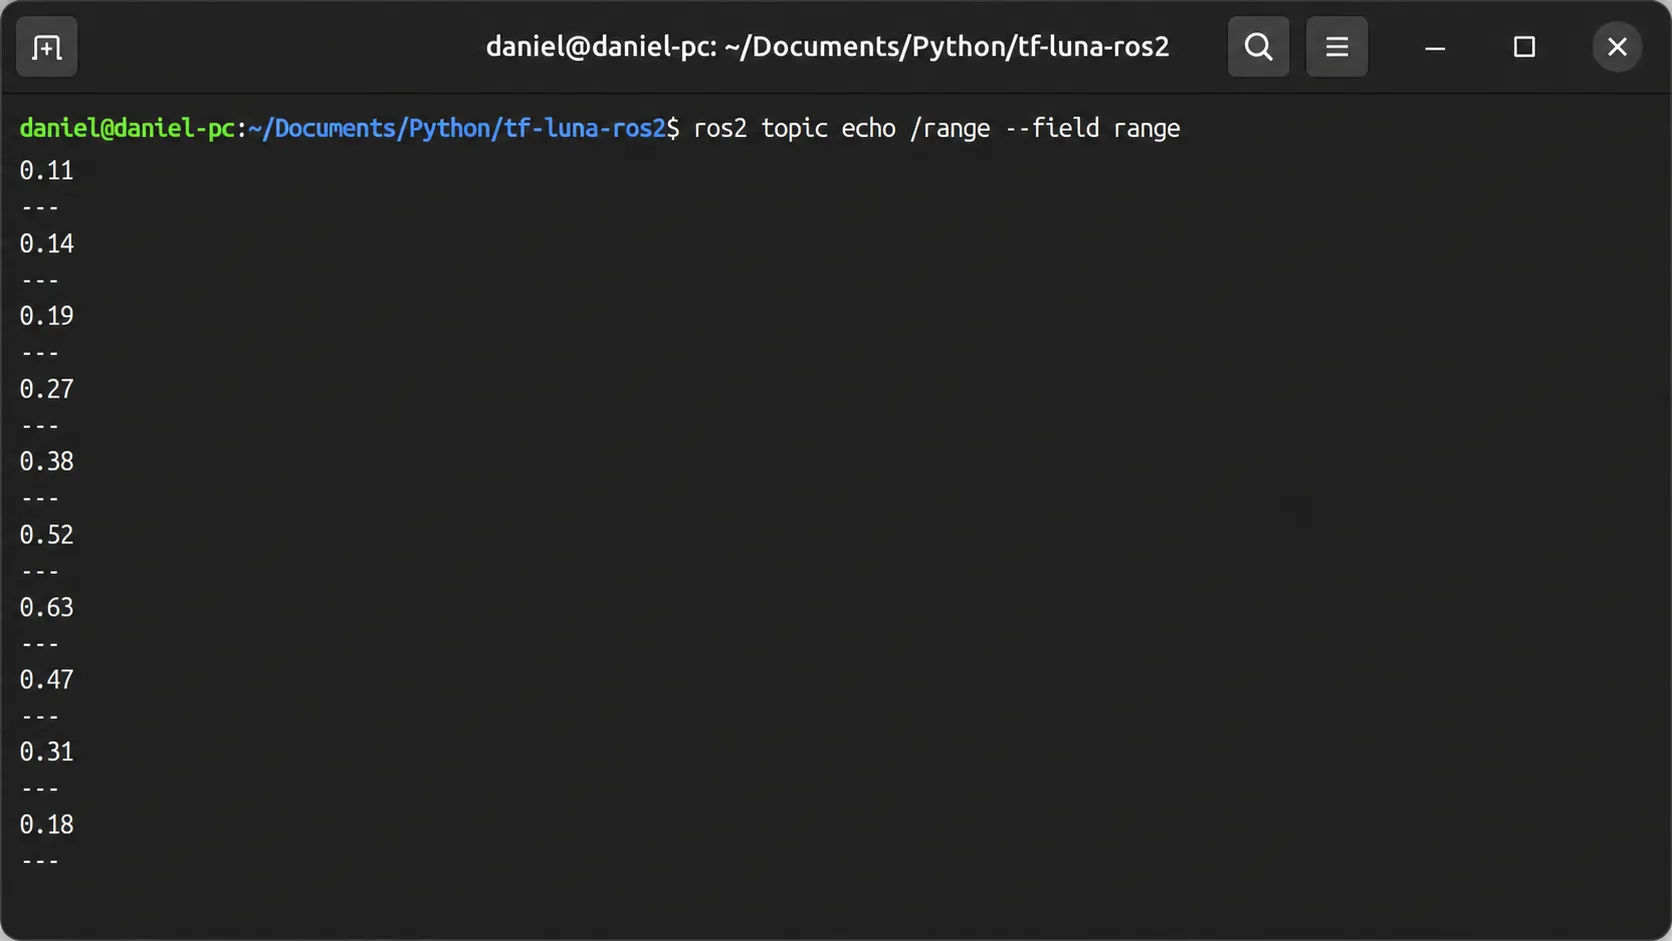
Live TF-Luna measurements arriving through the ROS 2 /range topic.
Adding a ROS 2 Launch File
The initial hardware command included several ROS arguments. I replaced that repetitive command with a Python launch file that exposes the serial port, baud rate, and simulation mode as launch arguments.
The hardware node can now be started with:
ros2 launch tf_luna_ros2 tf_luna.launch.py \
  port:=/dev/serial/by-id/usb-1a86_USB_Serial-if00-port0
Simulation mode is equally simple:
ros2 launch tf_luna_ros2 tf_luna.launch.py \
  simulate_sensor:=true
The launch file keeps configuration outside the node’s core logic and makes the package easier to reuse on another computer or robot.
Tutorial: Build and Run It Yourself
The complete source is available on GitHub, but the following steps show how the pieces fit together and how to run the package on a ROS 2 Jazzy system.
Documents
TF-Luna Manual: https://en.benewake.com/uploadfiles/2025/04/20250430174515390.pdf
What You Need
- Ubuntu with ROS 2 Jazzy installed
- Python 3
- Colcon
- pySerial
- A Benewake TF-Luna
- A compatible USB-to-UART adapter
Install the Python serial dependency if needed:
sudo apt install python3-serialSource ROS in every new terminal:
source /opt/ros/jazzy/setup.bash1. Clone and Build the Workspace
git clone https://github.com/danielengineer92/tf-luna-ros2.git
cd tf-luna-ros2

colcon build
source install/setup.bash
Confirm that ROS can find the package:
ros2 pkg prefix tf_luna_ros22. Run Without Hardware
Simulation mode is the quickest way to verify that the package, node, publisher, and message type are working:
ros2 launch tf_luna_ros2 tf_luna.launch.py \
  simulate_sensor:=true
Open a second terminal and source both ROS and the workspace:
source /opt/ros/jazzy/setup.bash
source /path/to/tf-luna-ros2/install/setup.bash
Inspect one published value:
ros2 topic echo /range --field range --onceChange the simulated reading while the node is running:
ros2 param set /tf_luna_node simulated_range 2.5Echo the topic again and it should report 2.5 meters.
3. Connect the TF-Luna
For a read-only UART connection, the essential wiring is:
TF-Luna power → appropriate power supply
TF-Luna GND   → USB-UART GND
TF-Luna TX    → USB-UART RX
Check which serial device Linux created:
ls -l /dev/serial/by-id/
ls -l /dev/ttyUSB* /dev/ttyACM*
When available, prefer a /dev/serial/by-id/... path because it is more stable than /dev/ttyUSB0 when devices are reconnected.
If the port is owned by the dialout group, add your user to it:
sudo usermod -aG dialout "$USER"Log out and back in before continuing, then verify with:
groups4. Test the Driver Independently
Testing the driver before starting ROS helps separate wiring and serial issues from node configuration issues:
cd src/tf_luna_ros2

python3 -c 'from tf_luna_ros2.driver import TFLUNA; sensor = TFLUNA(port="/dev/ttyUSB0"); print(sensor.get_measurements()); sensor.close()'
A successful reading resembles:
Measurement(distance_cm=42, strength=1800, temp_c=31.0)5. Launch the Hardware Node
Return to the workspace root, build, and source again:
cd /path/to/tf-luna-ros2
colcon build
source install/setup.bash
Start the node with the detected port:
ros2 launch tf_luna_ros2 tf_luna.launch.py \
  simulate_sensor:=false \
  port:=/dev/ttyUSB0
Or use the persistent device path:
ros2 launch tf_luna_ros2 tf_luna.launch.py \
  simulate_sensor:=false \
  port:=/dev/serial/by-id/usb-1a86_USB_Serial-if00-port0
6. Inspect the Live ROS Interface
In a second sourced terminal:
ros2 node info /tf_luna_node
ros2 topic echo /range --field range
ros2 topic hz /range
Move a target in front of the sensor. The /range value should change in meters, and the topic rate should be close to the configured sensor rate.
Troubleshooting
Permission denied: /dev/ttyUSB0
Confirm that your user belongs to dialout, then log out and back in.
The port opens but reads time out
Check sensor power, shared ground, TX-to-RX wiring, and the 115200 baud rate.
ros2 launch cannot find the launch file
Confirm the filename ends in .launch.py, that setup.py installs launch/*.launch.py, and that you rebuilt and sourced the workspace.
Python or the editor cannot import rclpy
Use the ROS-compatible system interpreter and source /opt/ros/jazzy/setup.bash. Avoid treating rclpy as an ordinary pip-only dependency.
The node is running but a second command does nothing
Run inspection commands in a second terminal. The terminal running ros2 launch is occupied by the node process.
What I Learned
This project connected several layers of robotics software that are often learned separately:
- Synchronizing with a continuous binary serial stream
- Validating checksums and decoding little-endian data
- Separating a hardware driver from application logic
- Testing protocol code without attached hardware
- Structuring an
ament_pythonROS 2 package - Publishing standard ROS message types
- Configuring a node through live parameters
- Managing Linux serial-port permissions
- Installing and discovering launch files with Colcon
- Debugging the difference between source files and installed workspace files
The most important engineering decision was separating responsibilities. driver.py knows about bytes and the TF-Luna protocol. node.py knows about ROS parameters, timers, and messages. The launch file knows how the node should be configured and started.
That separation made it possible to test each boundary before combining the complete system.